Analyst Manual
The advanced Mac workflow for capture, coding, multi-file review, clip search, presentations, reports, and professional interchange.
Current public release: Download Kaish Analyst from kaish.app.
1. Prepare the Mac and working files
- Install the exact Analyst release you intend to use and open the Applications copy.
- Keep original videos and Kaish documents in stable folders with enough free space.
- Sign in with an identity intended to have Analyst access, then verify the project and document names before editing.
- For live work, grant the required Camera, Microphone, Local Network, and folder permissions.
- For Blackmagic, install Desktop Video, match the source format, close competing capture apps, and test the device.
- For OBS, create the scene and start OBS Virtual Camera before selecting it in Analyst.
Never move an active capture folder, unplug its destination drive, or delete source media while recording or finalizing.
2. Verify account access without risking local work
Analyst requires a valid signed-in entitlement before protected project, capture, edit, save, import, Find, Combine, presentation, report, and export commands run. Signing out should not delete local documents.
- Launch Analyst while online and complete sign-in.
- Confirm the account and access result in the Project Browser.
- Open a disposable test project and verify an allowed command.
- Sign out and verify protected commands remain blocked while the local file still exists.
- Sign back in and reopen the test file before using customer work.
If a protected workflow runs while signed out, stop and contact support with the command and app version.
3. Use Project Browser once, then work from windows and menus
- Create a project or open the intended Analyst project/package.
- Verify the project name, package name, storage location, and media summary.
- Open only the professional windows needed for the task.
- Minimize or leave Project Browser behind the work.
- Use the macOS menu bar, command palette, Window menu, or shortcuts to reopen/focus tools.
- Command-0: Project Browser.
- Command-1 through Command-9: professional tool windows.
- Command-K: command palette.
- Command-F: Find in Analyst.
- Option-Command-W: close specialist windows.
Menu commands remain available while Project Browser is minimized. Use Command-0 when you need to bring it forward again.
4. Keep different jobs in independent windows
Review Workspace, Code Window, Tag Matrix Editor, Live Capture, DVR Review, Media Manager, Reports, Clips, Presentation Builder, and Export Center are intended to open independently.
- Open two different
.kaishcodefiles and confirm each has its own review timeline window. - Open more than two documents when the task requires it; no artificial two-document limit is intended.
- Open different presentations at the same time.
- Use the Window menu to switch among them.
- Open the same document again and verify Analyst focuses the existing window instead of duplicating it.
Each window must keep its own document context. Before editing, adding clips, or exporting, read the document name shown in that window.
5. Create, open, and verify a timeline
Start a standalone timeline from one video
- In Review Workspace, choose New Timeline…, or choose File → New Review Timeline from Video….
- Select one MOV or MP4 source.
- Name and save the new
.kaishcode. - Wait for Analyst to copy the selected movie into the portable package and open it for coding.
- Create a disposable tag, save, close, reopen, and verify both media and tag.
New Timeline is save-first and transactional: the package is built and checked before the current Review window is replaced. Canceling or a failed write leaves the current Review and source movie unchanged.
Open or extend existing Review work
- Choose File → Open Timeline…, open a Kaish document from Finder, or use the Project Browser.
- If the package includes portable media, let Analyst resolve it from the package.
- Use Add Video… to add another MOV or MP4 segment to the active timeline.
- Use Import XML / Tags… only after source order and media duration are correct.
- Use Relink / Resync Video… to choose the media again for the active segment when a file moved or the wrong source is attached.
- Confirm total duration, media part order, row count, and the first/last event.
- Play an early, middle, and late event, then save the active Review project.
The four Review Timeline actions are also available from the File menu while Project Browser is minimized. A current .kaishcode may contain media when created as a portable package. Older or reference-style timelines may contain metadata and paths only.
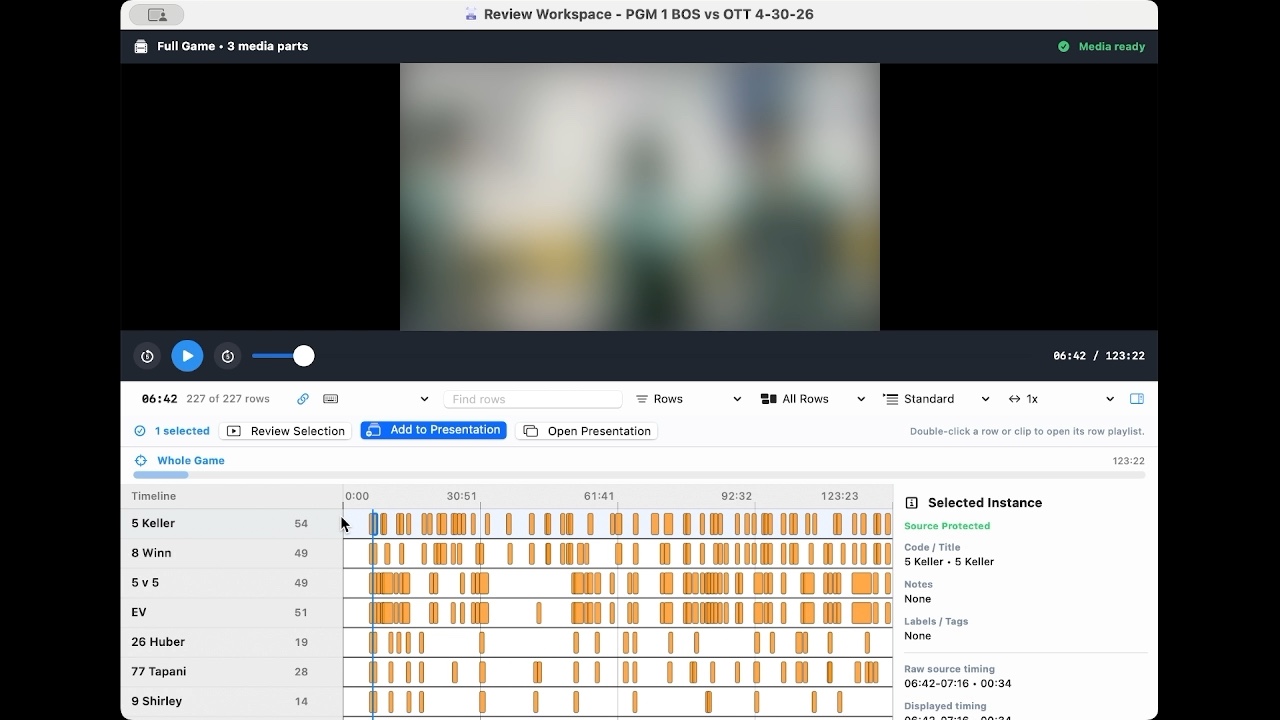
6. Play one clip, a row, or a selected set
- Single-click an event to inspect its source and displayed timing.
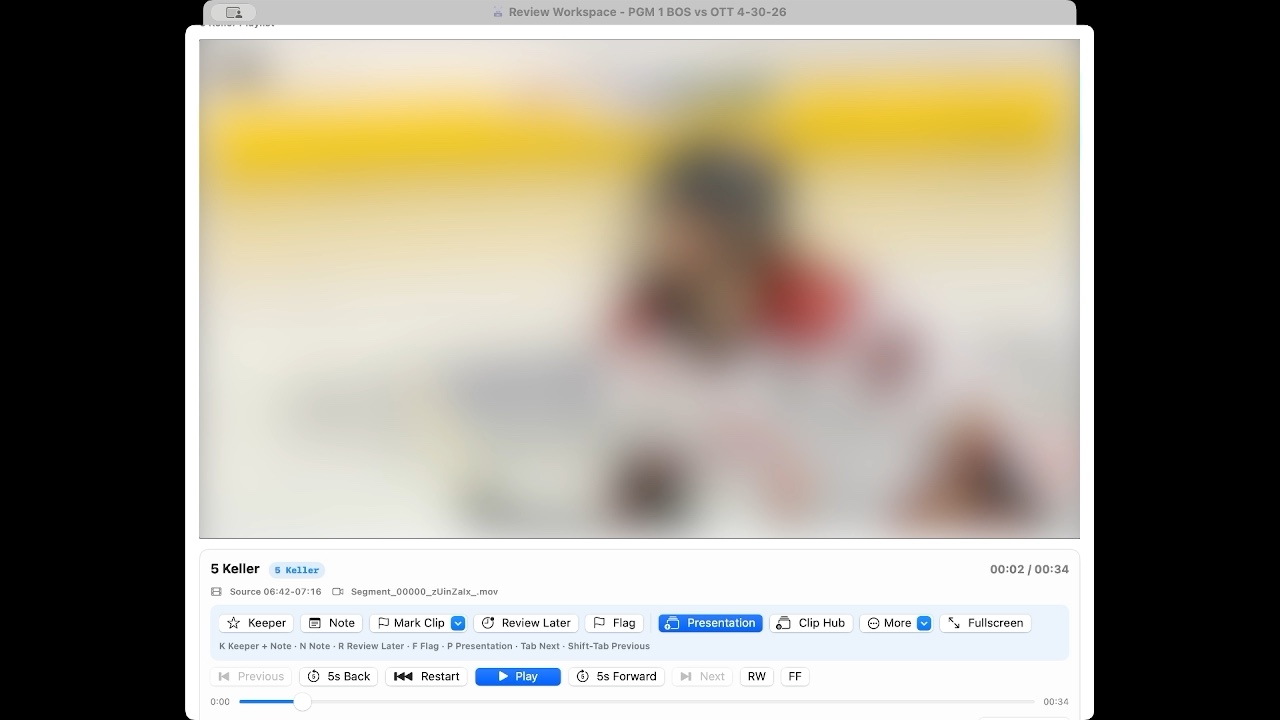
- Double-click a row or clip to open that row’s chronological playlist.
- Select several events and use Review Selection for the selected set.
- Use row/lane and visibility controls to define what belongs in the playback list.
- Switch to full-video playback only when you need unbounded source review.
- Verify lead/lag and any edited displayed timing without changing protected source timing.
Play a representative row and a cross-segment selection before a meeting. If a row stops after one event or plays the full source segment, preserve the file and report the selection, grouping, source-part boundary, and timing shown.
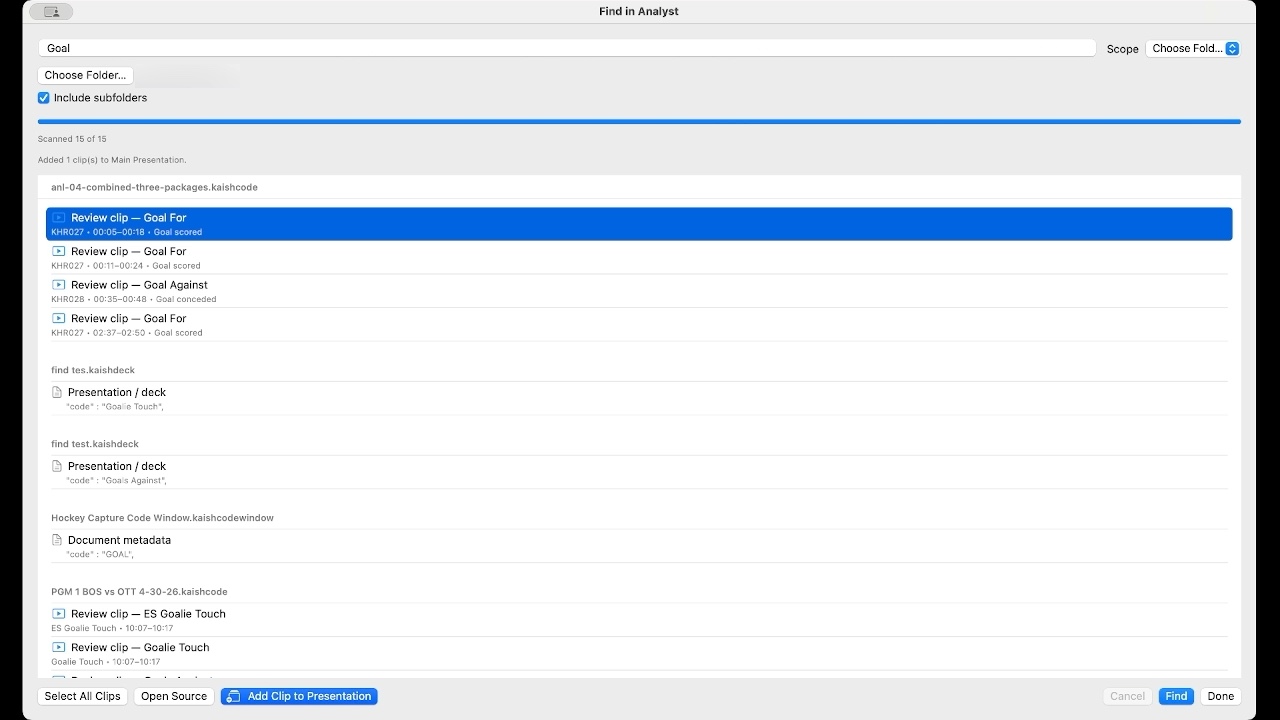
7. Find matching metadata across files
Find searches supported Analyst metadata—not video pixels, speech, or OCR.
- Choose Workspace → Find or press Command-F.
- Select Open Files to inspect currently loaded documents, or choose a folder.
- Enable Include Subfolders only when the wider scan is intended.
- Enter a player, code/tag, label, note, source filename, presentation name, or clip/bin name.
- Review results grouped by source document.
- Open/focus a result and confirm the correct row or clip is selected.
- To collect clips, focus the intended presentation first, then add selected playable results.
Folder scans are read-only and do not copy large media merely to index it. Open a result in its source Review Workspace and confirm its media before adding the clip to a presentation.
8. Keep clip references and portable media distinct
- Project/package clips: stay with the active Analyst project.
- Reference clip library: keeps links to source video and remains small.
- Portable clip library: copies the required selected clip media when validation succeeds.
- Clip pack: moves a selected set with the media required by that export.
- Open or create the intended library.
- Choose precise timeline events or Find results.
- Add only the selected clips.
- Reopen and play early/middle/late items.
- For portable output, move a copy to another folder and verify it without relying on the original path.
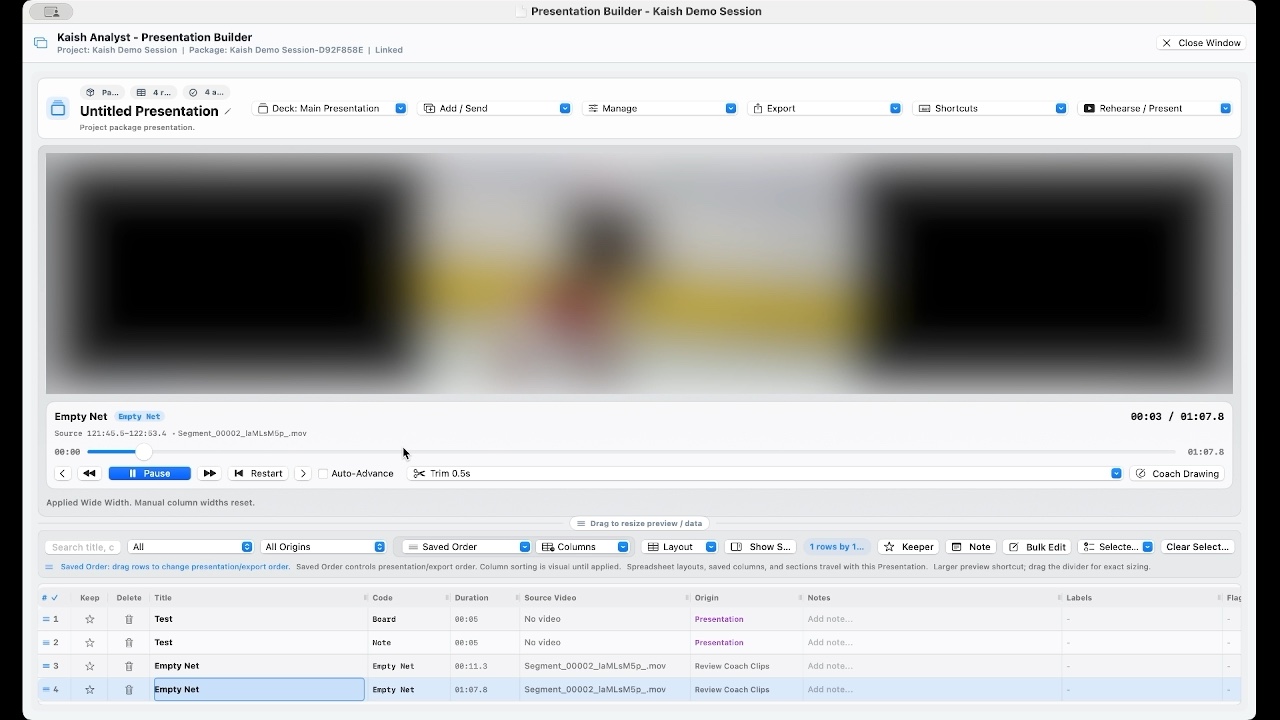
9. Build, focus, and convert presentations
- Create or open the presentation that should receive clips.
- Click its window so it is the active/focused presentation.
- Return to a timeline, library, or Find results and add the selected clips.
- Verify the destination presentation name and new rows.
- Reorder, trim displayed ranges, add notes/slides/drawings, and rehearse.
- Save and reopen before a meeting.
Save Presentation As → Standalone (Portable)… creates a .kaishdeckpack with selected bounded clips and required assets. If a range cannot be copied, keep the original presentation unchanged and resolve the source-media or destination issue before trying again.
Focus the intended reference or standalone presentation before adding clips. After adding later clips to an existing standalone, move a copy and play representative ranges before sharing it.
10. Route an independent Code Window safely
- Open the intended saved
.kaishcodewindowfrom Finder or the Analyst File menu, or open a Code Window from the workspace. - Open the Review or Live Capture destination that should receive new tags.
- Use the Code Window Target selector to choose the exact named destination, not merely the last window that had focus.
- Confirm the status says the destination is ready before pressing a code button.
- Choose Display Only when no open destination should receive tags.
- Verify button labels, colors, hotkeys, instant/manual behavior, lead, lag, labels, and actions.
- Run a disposable sample, then save the code-window document after intentional changes.
Closing the selected destination returns the Code Window to Display Only. Hotkeys should not fire while typing in a text field. Recheck the target when several Review or Live windows are open.
11. Keep live preview separate from DVR playback
- Create the session and choose video, audio, quality, and destination.
- Wait for source, format, audio, and storage readiness.
- Record a one-minute test and hit several tags with realistic lead/lag.
- Confirm the input preview remains continuous.
- For direct Blackmagic capture, enable DVR before recording and wait for ready media.
- Open DVR Review as a separate resizable window so playback does not replace the live input view.
- Stop and wait for finalization before opening the package in Review.
OBS Virtual Camera, FaceTime, USB/UVC, and Continuity cameras can be capture sources where shown, but the protected DVR path remains Blackmagic-only. iPad Bench DVR is included with eligible Elite and Team access and uses same-network pairing to the Mac. Pairing may need to be repeated after the DVR server restarts, so keep the six-digit pairing code available.
12. Combine compatible Kaish timelines
- Choose File → Combine .kaishcode Files….
- Add any number of compatible Kaish timeline files from supported Capture, Analyst, or other Kaish workflows.
- Arrange periods, halves, or segments in game order.
- Save a new result without overwriting the sources.
- Open the combined output and verify duration, segment order, tags, notes, labels, and media.
- Keep original files until the combined package passes playback checks.
The combine process should not alter capture or coding behavior in the source packages.
13. Build output from verified data
- Choose the intended timeline/package and report template.
- Set game, segment, team, player, code, label, or date scope.
- Check that required player and label metadata exists.
- Compare a small known sample against timeline events.
- Only then generate the full summary, CSV, or supported output.
A report cannot reconstruct context that was never coded. If numbers look wrong, inspect the underlying event, player, segment, and filter before changing the report layout.
14. Export a short sample before a full job
Choose the format expected by the receiving application, then create and open a short sample before exporting a complete job.
| Export | Result | Check before use |
|---|---|---|
| Presentation Video | A normal MP4 of the ordered presentation items. | Play start, transition, audio, final frame, and duration. |
| Sportscode Sorter | A supported .SCPlaylist interchange. | Open it in the target Sportscode version and inspect clip rows. |
| Focus | A supported .presentation interchange. | Open it in the target Focus version and inspect media references. |
| Clip Pack | Selected clips with required portable media. | Move the package and play representative clips. |
| JSON/CSV | Structured metadata for a supported downstream use. | Check headers, values, encoding, and row count. |
- Choose the destination through the macOS save panel so Analyst receives permission.
- Export one or two items first.
- Open the output in its destination application.
- Confirm exact ranges—not full source segments—where the format is clip-based.
- Keep the Analyst source until the receiver verifies the full export.
15. Use the right document type
| Document | Purpose | Media model |
|---|---|---|
.kaishcode | Editable Review timeline with tags, timing, notes, labels, and segment order. | A New Timeline or portable Analyst handoff copies its selected media into the package; legacy/reference files may require relinking. |
.kaishcapturepro | Analyst project/package context. | Depends on project/package and linked media. |
.kaishdeck | Reference presentation. | References source media. |
.kaishdeckpack | Portable standalone presentation. | Intended to copy selected clip ranges after validation. |
.kaishclips | Reference clip library. | References source media. |
.kaishcliplibrarypack | Portable clip library. | Copies validated clip media. |
.kaishcodewindow | Coding layout, buttons, rules, hotkeys. | No video media; choose an exact open Review or Live target at use time. |
.kaishreport | Report setup/output context. | Not a video container. |
Use a Finder folder chosen through Analyst when writing exports or portable documents. If a security-scoped permission error appears, choose a fresh authorized destination instead of retrying an old moved path.
16. Preserve originals while diagnosing
Media missing
Relink the package or parent media folder; verify part order and duration before saving.
Row playlist fails
Check selection, source range, media-part boundary, and whether full video works.
Find result will not play
Open/focus its source document, resolve media, and verify the returned range.
Wrong presentation receives clips
Focus the intended presentation, add one test clip, and verify its name before a batch.
Standalone save fails
Play every required range, verify free space and destination permission, then retry to a new package.
Full segment copied
Keep the output as evidence, preserve the reference source, and do not distribute the oversized package.
Export permission error
Use the save panel to select a new folder and export a short sample.
Project Browser jumps forward
Record the command/document that triggered it and verify menu access with Browser minimized.
17. Run the Analyst readiness checklist
- Install and open the current public release.
- Verify sign-in and the signed-out protected-command gate.
- Open several
.kaishcodefiles in separate windows. - Play one clip, a full row playlist, and a multi-row selection across segment boundaries.
- Find metadata in open files and a folder with subfolders; open and play results.
- Add timeline and Find clips to the currently focused reference and standalone presentations.
- Convert reference to standalone and verify only selected clip ranges after moving the output.
- Export short MP4, Sportscode, Focus, and data samples and open each in the receiver.
- Keep Project Browser minimized and verify menu commands remain available.
- If using capture, confirm continuous preview, finalization, Blackmagic DVR, and iPad pairing with the current Kaish App.
18. Know the current boundaries
- Folder Find searches supported document metadata; it does not interpret video or audio content.
- Reference documents depend on stable source paths until converted to validated portable output.
- Portable package size grows with copied clip media.
- Blackmagic DVR is not provided through OBS or generic camera capture.
- Interchange formats support the Kaish-tested subset; verify them in the exact receiving version.
- Hardware, operating-system permissions, and external storage still require a real-device test.